Most outdoor light fixture repairs are simple: shut power, diagnose, replace, seal.
A porch light flickers on a rainy night. The motion flood near your garage never seems to detect movement. Your coach light leans to one side after a windy storm. If this sounds familiar, you’re not alone. Outdoor light fixture repair feels daunting, but most fixes are straightforward with the right parts, safe steps, and a little patience. I’ve repaired hundreds of porch, garage, flood, and post lights over the years, and I’ve learned what lasts in heat, cold, and heavy rain. In this guide, I’ll show you how to diagnose issues fast, avoid common mistakes, and choose smart hardware that makes repairs cleaner and longer-lasting.
[3-product-listings-blocks]
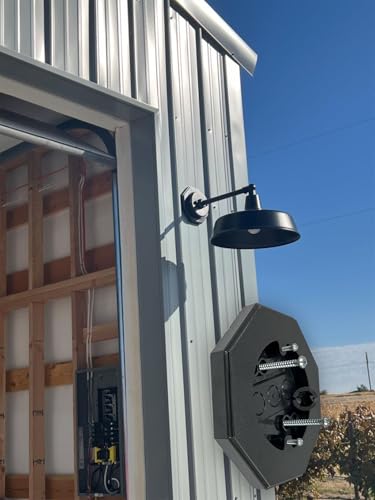
iMBAPrice Siding Lamp Octagon Mount Kit

This outdoor light fixture repair mounting kit fills a big gap I see on many homes. Contractors often screw a light straight onto vinyl or fiber-cement siding, which leaves a gap and poor weather seal. The iMBAPrice Vertical Siding Lamp Octagon Mount Kit solves that by giving your fixture a true, flat surface. It includes a built-in box area to help organize wire connections and improve stability.
In outdoor light fixture repair, the base is everything. A solid, flush mount keeps water out, reduces wind wobble, and protects wire splices. This kit creates a neat, professional look, even on tricky lap siding. If your light leans or the old mounting holes are stripped, this outdoor light fixture repair upgrade gives you a clean slate and a stronger, safer mount.
Pros:
- Flat, stable mounting surface for fixtures on lap or vinyl siding
- Built-in box area helps manage wire splices and depth
- Improves weather seal when paired with silicone and a gasket
- Reduces fixture wobble and long-term strain on screws
- Cleans up old holes and damage for a tidy, pro look
- Speeds up replacements and reduces callbacks after storms
Cons:
- May require careful cutting of siding for perfect fit
- Not a substitute for a fully compliant electrical junction box
- Black finish may not match all trim without paint
My Recommendation
If your porch or garage light sits crooked, gaps, or lets in rain, this outdoor light fixture repair kit is a smart fix. It is best for homeowners who want a long-term, sturdy base during outdoor light fixture repair without ripping into the wall more than needed. Pair it with a proper junction box behind the siding, a foam or rubber gasket, and quality sealing. You’ll get a clean look, tighter weather protection, and fewer future issues.
| Best for | Why |
|---|---|
| Leaning or wobbly wall lights | Creates a flat, stable plane that resists wind and vibration |
| Gaping or poorly sealed mounts | Improves weather seal when used with a gasket and sealant |
| Quick, tidy replacements | Covers old holes and damage for a clean, professional finish |
How I Approach Outdoor Light Fixture Repair
I always start with safety and a simple plan. Turn the breaker off, lock it out if needed, and test for power with a non-contact tester and a meter. Confirm no voltage before touching wires. Next, I look for moisture, corrosion, loose splices, and bad seals. Many exterior problems start with water getting in and staying in.
Then I check the base. If a light is mounted to clapboard or vinyl siding without a solid block, the fixture can tilt and pull on screws. That stress loosens splices and crushes gaskets over time. A stable base like an octagon mount or siding block prevents the wobble that can kill fixtures early.
Finally, I test the control. If you have a photocell, motion sensor, or smart switch, I isolate it. I bypass controls with a temporary connection and see if the light holds steady. If the light works when bypassed, the control is the likely failure.
Common Problems and Quick Fixes
Flickering or intermittent lights
Flicker often comes from loose wire nuts or corroded splices. Shut power off. Pull the fixture, and inspect the wire nuts and copper. If you see green or white powder, that is corrosion. Cut back to bright copper. Use new, listed wire connectors rated for wet locations. Add dielectric grease to the splice if the box is exposed to damp air.
Bulb issues can also cause flicker. LEDs can strobe if paired with incompatible dimmers or sensors. Use bulbs marked dimmer-compatible with your control type. Tighten the socket tab gently if the bulb sits loose. Do not bend it too far.
Fixture will not turn on
Test the switch and breaker first. Replace the bulb with a known good one. Check for line power at the box with a meter. If you have power on line but not at load, the switch or sensor is suspect. Bypass the photocell or the motion sensor temporarily. If it lights, replace that control.
Fixture trips the breaker
That can signal a short to ground or water inside the wiring. Inspect for pinched wires and sharp edges. Look for cracked gaskets and rust inside the housing. Dry the fixture fully before testing again. Replace compromised wire and any failed seal. Consider a fixture rated for wet locations if rain hits it directly.
Water inside the lens or base
Water means the seal failed. Replace the gasket. Re-seat the lens and use a thin bead of exterior-grade silicone around the top seam. Do not seal weep holes at the bottom. They allow any trapped moisture to escape. Angle the fixture so water sheds away from seams, not into them.
Leaning or loose fixtures
This is a structural mount problem. Screws may be in rotted wood, thin vinyl, or old holes that no longer bite. Install a proper mounting block or octagon mount that engages solid sheathing and a listed junction box. The iMBAPrice mount above is ideal for this use. It keeps the base square and weather-tight.
Step-by-Step Repairs for Popular Fixtures
Wall coach lights and sconces
Turn off the breaker. Verify power is off. Remove the bulb and the decorative cap nuts. Pull the fixture body off the mounting plate. Take a photo of the wiring. Disconnect wire nuts. Inspect the box and the siding for water and damage.
Check the foam or rubber gasket on the fixture’s backplate. If it is brittle or missing, replace it. If the siding is uneven, install a siding block or an octagon mount to create a flat base. Secure the box’s crossbar snug. Re-splice wires: ground to ground, white to neutral, black to hot. Support the fixture as you connect. Tighten all hardware. Seal the top and sides with exterior silicone. Leave the bottom unsealed to drain.
Motion floodlights
These live in wind and rain. They also move, which loosens joints. Start with power off. Remove the old flood. Inspect the gasket at the base. Replace it if it has flattened. Check each adjustable arm. Tighten locknuts. If the sensor fails to detect motion, set the range and time dials to medium first and test. Aim the sensor level, not up at the sky.
Use LED PAR bulbs rated for damp or wet locations. Some motion lights have integrated LEDs. If they fail early, replace the whole head as a module if the brand allows it, or replace the entire fixture. Seal all cable entries. Check for a clear line of sight to your driveway or yard.
Post lights on driveways and walk paths
Post lights often fill with water because of poor base seals. Remove the top and the glass. Clean out debris and insects. Inspect the foam grommet under the cap. Replace if cracked. Verify the wire entry at the base has a drip loop. That loop forces water to drip before it enters the pole.
Many post lights sit on concrete. If the base screws have rusted, replace with stainless steel. Add anti-seize to threads for easier future removal. Ensure the in-post splices sit inside a listed, weather-rated splice kit. Moisture in the pole can cause corrosion and shorts.
Under-eave or soffit lights
Shallow cans and discs can overheat if covered by insulation without the right rating. Verify the fixture is rated IC if it touches insulation. For LED discs with adapters, check the socket and adapter connection. Use a small dab of dielectric grease in the socket to resist corrosion. Seal the trim ring to the soffit with a thin bead if wind drives rain.
Smart Upgrades During Repair
Outdoor light fixture repair is the perfect time to upgrade. Add a photocell to coach lights, so they turn on at dusk and off at dawn. Use a dual-bright motion light for the driveway, so it runs dim until it detects motion. Choose replaceable-lamp designs for easy future maintenance.
Consider high CRI LED bulbs. They show real colors, which helps cameras and improves curb appeal. Aim for 2700K to 3000K for warm, welcoming light near doors. Use 4000K to 5000K for security floods. Keep lumens sensible, so you do not blow out night vision on security cameras.
If you use smart bulbs or smart switches, confirm outdoor ratings. Place smart switches in covered locations or use in-use covers. Update firmware. Separate Wi-Fi congested zones by using 2.4 GHz where range matters outside.
Tools and Materials Checklist
I keep a simple kit ready for every job:
- Non-contact voltage tester and a multimeter
- Exterior-grade silicone sealant and a small caulk tool
- Assorted listed wire connectors for damp/wet locations
- Dielectric grease and anti-seize compound
- Stainless steel screws and machine screws
- Replacement foam or rubber gaskets and O-rings
- Photocell and motion sensor replacements
- LED bulbs rated for damp/wet locations
- Siding mounting block or an octagon mount kit
- Painter’s tape and a pencil for layout
For siding work, add a fine-tooth saw or oscillating tool. Score cuts before you remove material. Always wear eye protection and gloves when cutting or drilling. Keep a drop cloth to catch debris and broken glass.
Safety and Code Essentials
Always turn off the breaker and verify no voltage with a tester. Do not rely only on a switch. Outdoor light fixture repair must follow the listing on the fixture. If it is marked “wet location,” outdoor light fixture repair can get rained on. If marked “damp,” outdoor light fixture repair must be protected by a roof or eave.
Bond the ground wire securely. Use a ground screw to the box or the fixture’s green ground screw. Keep wire splices inside a listed box. Do not bury splices behind siding or inside a pole without a listed splice kit. Use exterior-rated fittings and seals where the cable enters the box.
GFCI protection is often required in exterior circuits for receptacles and can protect lighting circuits where added safety is desired. Follow local code and manufacturer instructions. If you are not sure, call a licensed electrician. A quick consult can save you time and risk.
Costs, Time, and When to Call a Pro
Most wall light swaps take 30 to 60 minutes if the base is solid. If you add a siding mount or fix a box, plan for 90 minutes. Motion floods take a bit longer to aim and tune. Post lights can take two hours if you must clean and reseal the base.
Replacement bulbs and gaskets are cheap. Motion sensors and photocells are moderate. Full fixtures vary by brand and finish. Mounting kits like the iMBAPrice unit cost little but protect much bigger investments. If you see signs of overheated wiring, burnt insulation, or unknown cable paths, stop and call a pro.
Permits may be needed for new runs or adding new boxes. Like any skilled job, good prep prevents callbacks. A clean mount, tight splices, and correct seals keep your lights working in storms and seasons.
Care and Preventive Maintenance
Once a year, give your exterior lights a fast check. Tighten cap nuts and set screws. Clear cobwebs and insect nests. Clean lenses with a mild soap and water. Avoid harsh chemicals that damage seals and finishes.
Look for rust spots. Touch them up with a compatible outdoor paint or clear coat. Lubricate metal threads with anti-seize. Reapply a thin bead of silicone along the top seam if you see cracks. Replace tired bulbs with fresh, matched LEDs.
Keep shrubs trimmed back. Plants that touch fixtures can trap moisture. That invites corrosion and insects. A few minutes of care extends the life of your repair and improves curb appeal year-round.
Buyer’s Guide to Mounting Blocks and Boxes
I always check the mount before I touch the bulb. If the base rocks or the screws strip out, your repair will not last. Here is what I look for when choosing a mounting solution for outdoor light fixture repair.
Fit and finish
The block must sit flat against your siding profile. Some blocks fit vertical or horizontal laps better than others. A black block like the iMBAPrice kit blends with many fixtures, but you can also paint it to match trim. A neat edge makes the fixture look new.
Structural support
Blocks and octagon mounts should anchor to solid sheathing or a backing board. Screws must bite. If they do not, the fixture will wobble in wind. That movement breaks seals and cracks wire nuts.
Electrical compatibility
Use a listed junction box behind the block unless the block itself is part of a listed enclosure system. Keep wire splices inside that box. Use a proper crossbar for the fixture pattern. Do not overstuff the box with wiring; respect capacity limits.
Weather sealing
Pair the block with a foam or rubber gasket. Apply silicone along the top and sides, not the bottom. Leave a path for drainage. Check the siding cuts. Clean cuts help the seal last longer.
Real-World Repair Scenarios and Solutions
Scenario 1: Porch light flickers after rain
I see this often. The fix starts at the base. Remove the light. The backplate gasket is flat and the siding is lapped, so water sneaks behind. Install the iMBAPrice octagon mount to flatten the surface. Add a fresh gasket and reseal the top edge. Replace corroded splices with new, listed connectors and a dab of dielectric grease.
Finish by installing a damp/wet rated LED bulb. Check the socket tension. Reassemble and test. The light runs steady because water can no longer invade the splice zone. The new base prevents wobble that would have reopened those leaks.
Scenario 2: Motion flood works, then fails at dusk
This one sounds like a photocell conflict. Many motion lights include dusk sensors. Some homeowners add a separate photocell or a smart switch with schedules. Two brains fight each other. I disable one control. If the motion light has a dusk-to-dawn mode, use only that. Or keep the switch dumb and let the light’s built-in sensor do the work.
If the light still fails, I bypass the sensor to check the LED heads. If they are fine, I replace the sensor module. If heads are dead or dim, I replace the whole unit. New floodlights are efficient and bright, and many are repairable with plug-in heads.
Scenario 3: Post light rust and water damage
Post lights can be ponds for condensation. I pull the top, dry the inside, and clean the lens. I add a drip loop on the feed wire and a weep hole if the design allows it. I replace rusty base screws with stainless and coat threads with anti-seize. I refresh the base seal to the concrete with a thin bead of silicone.
Finally, I raise the in-pole splices into a listed waterproof splice kit. That keeps moisture from wicking into copper. The light lasts longer, and breakers stop tripping during storms.
Material Choices That Last Outside
Weather is hard on finishes. Powder-coated aluminum resists rust. Coastal homes benefit from marine-grade stainless or composite fixtures. Brass and copper patina gracefully. Thin steel rusts fast at cut edges. Choose solid materials if storms and salt spray are common.
For seals, closed-cell foam gaskets hold shape better than open-cell. Silicone O-rings resist UV and heat. Use silicone sealant rated for exterior, not bathroom-only, because UV degrades some formulas. For fasteners, stainless or coated screws survive years of rain and sun.
Lighting Performance Tips
I want lights to look good and work well. Keep color temperature warm near doors. Use brighter, cooler light for security and driveways. Adjust motion sensors to avoid false triggers from trees or roads. Aim heads where you need light, not into neighbors’ windows.
Control spill and glare. Shrouds and baffles reduce glare. Dim or lower output at night if your light stays on for long periods. Many lights allow lower settings without extra parts. Your eyes and your neighbors will thank you.
Easy Wins During Outdoor Light Fixture Repair
- Add a longer pigtail on the ground wire to make reassembly easier
- Label line and load when you have complex controls
- Use a bubble in-use cover for smart switches outdoors
- Wrap wire nuts with a single layer of high-quality electrical tape if exposed to vibration
- Use a small level to square the fixture before tightening cap nuts
These small steps take minutes, but they prevent future headaches. They also make your next bulb change simpler. Good prep pays off every season.
When a Repair Becomes a Replacement
Replace the whole fixture if the socket is burned, the housing is cracked, or the finish is flaking badly. Replace if seals are no longer available. Replace if the integrated LED driver fails and parts are not serviceable. The cost and time often favor new, efficient fixtures.
Choose a model with standard screw-base bulbs if you want easy future repairs. If you pick integrated LED, buy from a brand that sells replacement heads or drivers. Check the warranty and keep the receipt. That paper can save you money if the driver fails early.
Choosing Bulbs and Controls That Play Nice
LED bulbs vary. Some do not like certain photocells or motion sensors. To avoid issues, choose bulbs and controls from the same brand line or check compatibility charts. Look for bulbs that list “dimmable” if you use motion lights with low-level standby modes.
Outdoor-rated bulbs handle humidity and temperature swings better. Pay attention to operating temperature ranges. Cheap bulbs can dim in cold weather. Quality LEDs run steady from winter to summer.
Waterproofing Best Practices
Start at the top and work down. Seal the top and the sides of wall plates. Leave the bottom open so water can drain. Replace flat or cracked gaskets. Use silicone where metal meets siding or concrete. Keep weep holes clear.
Check cable entries. Use strain reliefs or bushings where wires enter boxes. Sharp edges can cut insulation. Add a drip loop on any cable that rises up into a fixture. That single loop stops water from running into the housing.
Grounding and Bonding Essentials
Ground connections save lives. Tie the green or bare copper ground to the metal box and the fixture ground. Use a listed ground screw. Tighten it firmly. Do not leave ground wires floating in the box. That is a common error in older homes.
If you use a plastic box, attach ground to the fixture and any strap that needs outdoor light fixture repair. Follow the fixture’s instructions for bonding. Many wall lights include a separate bonding jumper that must be used. Keep ground splices longer so you can reattach easily during future service.
Outdoor Light Fixture Repair for DIYers: A Simple Plan
I like simple steps that anyone can follow safely:
- Turn off the breaker and confirm no power
- Remove the fixture and inspect the mount and wiring
- Replace bad splices and flat gaskets
- Install a proper mounting block or octagon base if needed
- Reassemble with stainless screws and fresh sealant
- Aim or level the light and test controls
- Clean up and note the date for future maintenance
This plan keeps you focused and safe. outdoor light fixture repair covers most porch and garage lights. If you hit anything beyond your comfort level, pause and call a pro. Your safety matters more than speed.
Siding, Brick, and Stucco: Mounting Differences
Vinyl siding moves with heat. Use a siding block that floats correctly and keeps the face flat. For brick, use a solid box with masonry anchors. Keep fasteners tight, but do not crack brick. For stucco, seal penetrations and use a box designed for stucco thickness.
Every wall type needs a true, flat surface. That is why I like the iMBAPrice octagon kit on lap siding. It takes the slope out of the equation. Your light sits square, and your seal lasts longer through rain and heat cycles.
Troubleshooting with a Meter: Fast Checks
If a light fails, measure voltage at the box. Check line hot to neutral and hot to ground. You should see full voltage. If hot to neutral is low but hot to ground is normal, you may have a neutral issue. Fix that splice. If no voltage, check the switch and upstream connections.
For motion lights, check voltage at the heads when motion triggers. If voltage arrives but the LEDs do not illuminate, the heads have failed. Replace the head or entire unit. If no voltage arrives at trigger, the sensor module is likely bad.
Environmental Factors That Kill Fixtures
Salt air accelerates corrosion. Choose marine-grade or composite fixtures near coasts. Wind drives rain under loose seals. Tighten and reseal yearly in exposed areas. Sun beats finishes. UV-stable coatings last longer and fade less.
Insects love warm housings. Use fine screens or gaskets that fit right. Keep gaps closed. Avoid sealing the bottom drain. That is the escape route for condensation. Balance airflow with weather protection.
Warranty and Documentation Tips
Save your receipts, packaging, and manuals. Note the install date inside the base with painter’s tape and a marker. Keep a photo of the wiring before you disconnect it. That picture saves time when you reassemble after outdoor light fixture repair.
Register your fixture if the brand offers it. Warranties vary from one to five years or more for integrated LEDs. If a driver fails early, a simple claim can get you a replacement. A little paperwork goes a long way.
FAQs Of outdoor light fixture repair
How do I know if my outdoor light needs repair or full replacement?
If the housing is cracked, the socket is burned, or seals are gone, replacement is better. If issues are loose splices, gaskets, or a bad sensor, a quick repair often solves it.
Is it safe to do outdoor light fixture repair myself?
Yes, if you turn off the breaker, test for no power, and follow instructions. If wiring is damaged or unclear, call a licensed electrician.
What bulbs should I use outside?
Use LED bulbs rated for damp or wet locations. Match color temperature to the space: warm near doors, cooler for security floods.
Why does my motion light turn on randomly?
It may see moving trees, cars, or pets. Aim the sensor lower, reduce range, and avoid multiple controls fighting each other.
How do I stop water from getting into my wall light?
Install a proper mounting block, replace the gasket, and seal the top and sides with exterior silicone. Leave the bottom unsealed for drainage.
Final Verdict: Which Should You Buy?
If your wall light leans, wobbles, or leaks, a proper base is your best upgrade. The iMBAPrice Siding Lamp Octagon Mount Kit gives a flat surface, tidier wiring, and stronger seals.
It is a small cost that pays off big in outdoor light fixture repair. Pair it with fresh gaskets, quality LED bulbs, and careful sealing for a durable, pro-level result.
This chenille rug set is a quick, high-impact upgrade.
Deep navy anchors light tiles and white tubs, while the striped texture hides lint and adds subtle depth. Instant warmth underfoot, effortless style, zero clutter.
If you want practical elegance that transforms your bathroom in minutes, this is the smart choice.
✨ DecorVillaa.com curates rug sets that blend function, comfort, and style—place once, enjoy daily.
Think of this as preventative care for your spa.
An oil-absorbing sponge floats quietly on the surface, capturing body oils, lotions, and light scum before they cling to the shell or clog the filters. The result? Clearer water, less maintenance, and no slick ring around the tub.
Small tool. Big hygiene upgrade.
If you want cleaner spa water with less scrubbing and fewer chemicals, this is a smart addition.
🛁 DecorVillaa.com highlights practical hot-tub accessories and privacy ideas that keep backyard spas fresh, calm, and easy to maintain—float it in, relax more, clean less.